
Welcome back to the craft room and today’s Bow Gift Tags Free SVG File post. Now that Thanksgiving is over, it is time to get into the holiday spirit. What better way to start things off than with gift tags! Every year I enjoy creating my own tags and this year is no exception. Earlier this summer I shared my Christmas In July Gift Tags post with you. There I showed tags made with a tree cutout as well using the pen feature with the Cricut. When we needed more tags, rather than create more of the same, I took to Affinity Designer 2 iPad and created another version to share with you. Let’s take a look at how I made these new gift tags.
Designing The Gift Tag SVGs
To begin creating, I once again thought about the simple shapes I could use. Below is an image of the shapes I chose to create these gift tag as well as the bow cutout. This tag is nothing more than a rectangle and trapezoid. The bow was made with a heart, oval, and a rectangle. At this point in the creative process, size really doesn’t matter, we can adjust that later on.

The Tag Shape
Let’s start with the tag itself. On a new art board in Affinity Designer 2 iPad, I brought over duplicate copies of the rectangle and trapezoid. With the snap feature turned on, I simply lined up the two images as shown below. At this point, if the trapezoid is too tall for your liking, or the angles are too sharp, you can adjust them with the node tool. I am happy with how they look, so I selected both shapes, and added them together to create one shape. In Cricut Design Space, this is the same as the “unite” and “weld” feature.

The Bow Shape
To begin the bow, I brought over a duplicate copy of the heart onto my art board. After turning it sideways, adjustments were made to help it look more like half of a bow. I then duplicated that shape and flipped it horizontally to make the second half. I messed with the placement a bit, and then added the shapes together to create the loops of the bow. At this point I brought over a duplicate copy of the oval and adjusted it to size. For the moment, that’s all we are going to do with this shape.


Next we are going to create the bow tails. These are super easy to create with a rectangle shape. Starting with the end of the tie, I added a node and manipulated it to form a fish tail end. All that’s left is to add a curve to the sides. When it looks right, duplicate the “tail” and flip it horizontally. When the tails are placed where you want them, choose everything but the oval, and add them together to create one shape.
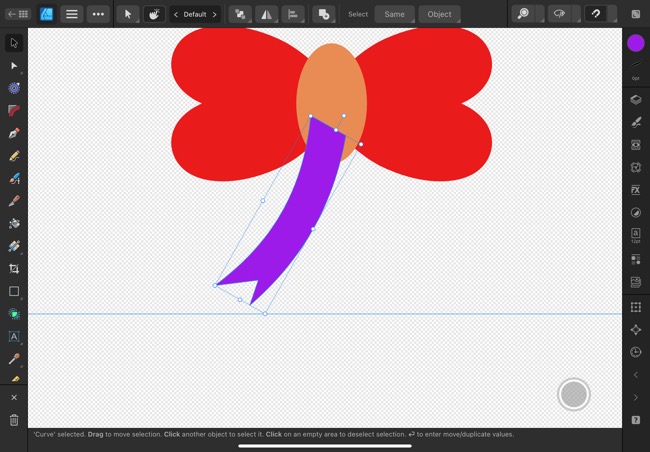

The next part is the crucial step to ensure the bow will still look like a bow once cut away from the tag base. Reposition the oval in the center of the bow. Choose both objects and then click divide. At this point, only move the sides of the bow away. Select the center oval, which is now separated into three different pieces, and click add. This will create a single object once again. As you can see in the image below, I then moved the sides of the bow back into place, leaving a gap around the center oval. Choose all of the elements and add them together into one final shape.

The Finished Tag
Now we are going to go back to the gift tag base. Move the bow into place and adjust the sizing as you see fit. Highlight the bow and tag and click subtract. As you can see below, you need to leave the space around the center of the bow. This way the cut out still looks like a defined image rather than just the cut out shape of a blob.
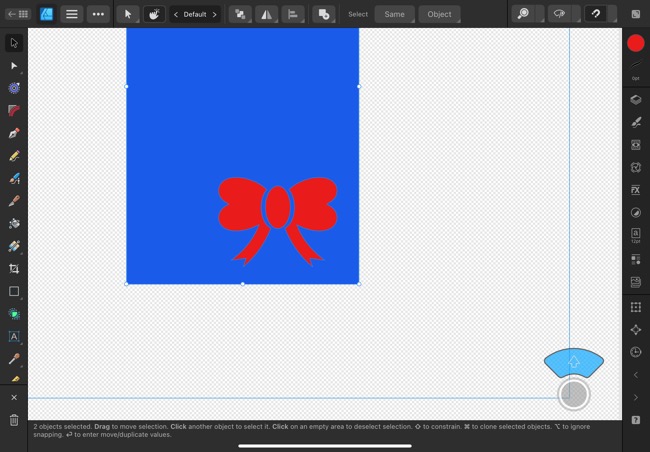

All you need now is to create the base tag in the size you desire and layer them together. I chose to duplicate the tag and add a square over the cut out to hide it. After changing the color of the new tag shape, I sized it to be a quarter inch larger.

To add another level to this gift tag I also added the “To” and “From” text in Affinity Designer. There are so many fun fonts out there, however, if the plan is to let the Cricut machine write it, you must keep something in mind. The Cricut machine, for reason’s I don’t understand, will only outline letters. So if you opt for a bold fancy text, the finished product will be an outline of that font rather than a filled in font. With that in mind, I chose the font Clean Notes from Creative Fabrica, a very thin yet still pretty font.
Working In Design Space
As much fun as I have explaining the process for creating these gift tags, I know there are some who don’t want to go down that road. Or perhaps you are too busy this time of year to try designing. I’ve got your back! I’m sharing the SVG file for these tags. By clicking the link below, you will be taken to Google Drive where you can download the file for free. The file will give you a 2.75” x 4” tag base as well as two versions of the tag front that measure 2.5” x 3.75”. Feel free to resize them to fit your particular needs.
Let’s move on to Design Space now. After you upload the file, ungroup everything and delete the tag front you don’t want to use. If you chose to use the tag with the text, go ahead and ungroup that tag. You will need to choose the words and change them from Basic Cut, to Pen before you begin. After they have been changed, select the text and tag and click attach. This will ensure the text is printed exactly where it should be. Duplicate the tag layers as many times as needed. To get the maximum number of tags from my card stock I created an 11.5” square and spaced them as shown in the image below. After you have this done, select everything and attach them together so Design Space will cut them correctly.

In the images below you can see my finished tags, I am using the black 0.4 tip pen that came with my Cricut Explore Air 2. This font printed perfectly as well. If you look closely at the colons, you can see what I meant by the font will only be outlined. The Cricut machine did not fill in the center of these dots.


Completed Bow Gift Tags
I used white and red Recollections card stock for my gift tags, and I love how they turned out. To adhere the layers together, I used a bit of Art Glitter Glue, being careful to add a small amount around the bow cut out. I decided against adding a hole at the top for ribbon or string. Rather, I have added double sided Scor-tape to the backs for a quick application.

Thank you so much for joining me for today’s Bow Gift Tags Free SVG File post. It was a long one, but I do hope you enjoyed it. I also hope you will take advantage of the free Bow Gift Tags Free SVG File download. I would love to help reduce your holiday stress.
As of today we are officially 27 days away from Christmas! Are you ready? I know I’m not, but we are getting closer to being done. If you need more gift tag inspiration, check out my Gift Tag Category. Have a wonderful week ahead and I will see you back in the craft room again soon!
PIN THIS POST FOR LATER!
